


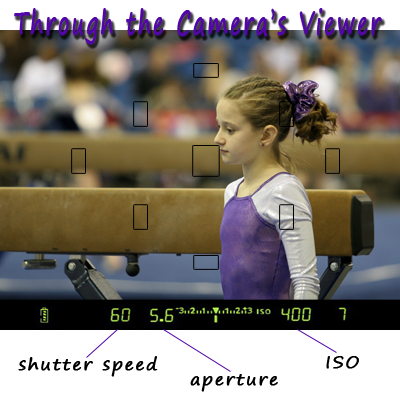
Sample Images and Camera Settings
Have you ever optimistically raised your camera to your eye, focused, clicked, and thought 'oh, what a great shot'? Sure, we all have. Then we anxiously press the display button to view our new treasure in the LCD window only to find that something has gone terribly wrong. WHAT! A bad picture. It has happened to all of us at one time or another. That's how we learn what NOT to do.
All of these images, well most of them, were shot twice, in full manual mode, where we determined, not always correctly, the shutter speed, aperture, and ISO. You will see that with just minimal tweaks of the settings the image exposure improves drastically. Sometimes major tweaks are required to achieve our desired result. If you're wondering what the arrangement of the numbers is under each image, it is shutter speed, aperture, and ISO. This is the same arrangement you will find in your camera's viewer when setting up your picture. Metering and exposure compensation is covered on another page.
fall, cloudy, late afternoon
1/320; f/4.5; 200
focal length: 55mm; no flash
1/80; f/4.5; 400
As you can see, I needed to reduce the shutter speed quite a bit which allowed the shutter to stay open longer allowing in more light. I also followed the ISO guideline for a cloudy day and bumped it from 200 to 400. I wanted a fairly shallow depth of field so I held at f/4.5.
night, no backlight

5 sec; f/5; 640
tripod with 2 second delay

5 sec; f/5.6; 200
In my opinion, the photo on the left needed help in several areas. First of all, it needed a tighter zoom for better composition. I also felt like it was a little over exposed so I made adjustments to the aperture and ISO but left the slow shutter speed of 5 seconds. I wanted to blur the waterfall while keeping the fixed objects in focus.
night, fairly well lit city street
10 sec; f/7.1; 160
tripod with 2 second delay
3.2 sec; f/7.1; 160
Traffic is always something fun to shoot. The pattern never repeats itself exactly. The first exposure, on the left, was shot entirely too slowly - 10 seconds. While keeping the depth of field constant at 7.1 to keep nearly all the buildings in focus, the only setting that was changed was shutter speed. As you might guess, it makes a huge difference.
bright and sunny summer afternoon
1/320; f/6.3; 200
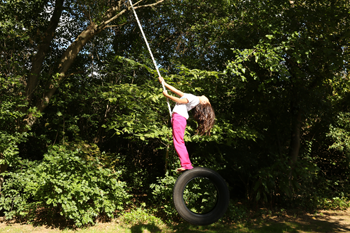
sun and shade challenge
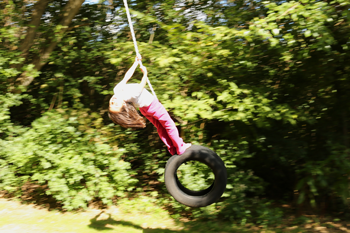
1/80; f/6.3; 125
The first image, on the left, was a great example of stopping the action; however, if your goal was to show action, then a technique called panning is needed. The shutter was adjusted down from 1/320th of a second to 1/80th of a second which keeps the subject fairly focused while showing motion in the background.
dark room with dimly lit mural
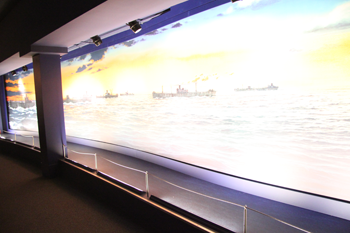
1/25; f/4; 3200
lit only by spot lights
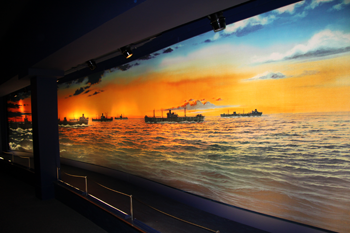
1/60; f/4; 400
The first attempt at shooting this mural was seriously overexposed. By drastically reducing the amount of light by increasing the shutter speed and decreasing the ISO, this image improved remarkably.
moderately lit arena
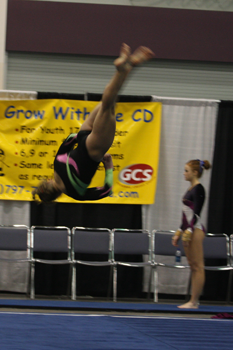
1/125; f/2.8; 800
focal length 200mm
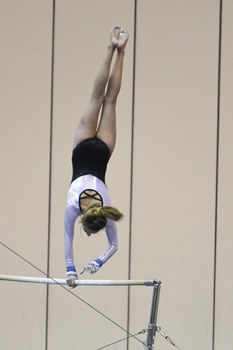
1/320; f/2.8; 1600
Many indoor sports photos are taken with a wide aperture to compensate for low lighting and fast shutter speed and these gymnastics photos are no exception. The floor routine was taken with a slower shutter speed which resulted in motion blur but the bar image was shot faster and returned better quality.
dimly lit restaurant

1/125; f/2.8; 320
focal length 28mm

1/250; f/2.8; 320
While vacationing, this server was joking with our group during dinner. I got up to take a picture of something else and he asked me to take his picture. So, with the settings I had, I clicked. The dark, very underexposed image was what I got. Since my camera has built in flash, the fastest speed while using flash is 1/250th. When I turned on the flash, the camera adjusted the shutter speed and the result improved.
bright sunny mid-day; shot in the shade
1/400; f/5.6; 100
focal length 70mm

1/250; f/5.6; 100
If you were wondering how fill flash differs from indoors to outdoors, this should answer your question. It works the same. To avoid dark shadows on faces, especially when shooting in bright sun or at mid-day, always use a flash outside when you're shooting portraits.
fall, cloudy afternoon
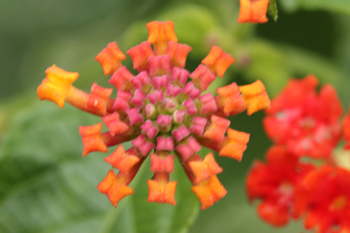
1/80; f/7.1; 400
focal length 100mm
1/80; f/8; 400
Unfortunately this beautiful flower that suffered from camera shake was never re-shot. The photographer viewed it in the LCD screen where it looked sharp and in focus; however, after viewing it in full scale on the computer, it is noticeably blurry.
bright sunny summer day; hand held
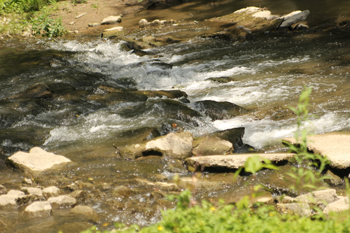
1/1250; f/2.8; 100
focal length 75mm; tripod with remote shutter release
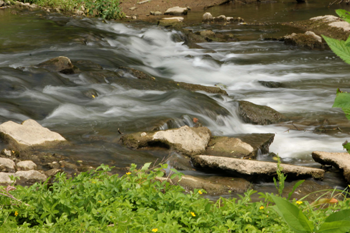
1/4; f/32; 100
These two images show the extreme in shutter speed and aperture. In the left photo, the shutter speed is fast and shows the details of the water while the aperture is wide blurring the foreground and background. The right photo's shutter speed is slow which produces a smooth blur of the moving water while its aperture is narrow letting in very little light. Remember, a narrow aperture keeps nearly everything in focus.
In Summary......
As you can see from just these few examples, there are many many combinations for shutter speed, aperture, and ISO. The lighting in your scene helps determine where to start in many situations and your own personal preference guides you from there.
Experiment a lot with different settings and combinations. Remember to check your LCD screen between shots to make sure the results are what you're expecting. If not, adjust and click again. As a rule, I generally do not delete from my camera. It's much safer to delete poor quality or duplicate images from your computer once you've viewed them in full size.